Here's a new post...
With a link
The Exploding Whale
This video was suggested to me by some colleagues of mine and after watching it I couldn't help but notice the similarity between the highways department, and teachers as we try to deal with the massive (whale like proportions) task of implementing and managing technologies in our classrooms.

Putting Pictures in Their Place
It doesn't take long for new bloggers to want things to look the way they want it. This is really rather reasonable since it is your blog after all.
 When inserting an image using the upload image tool blogger asks you how you'd like it formatted.
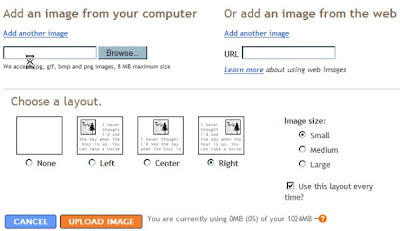 Start by picking the formatting you'd like the most. Once blogger has finished uploading the image you will be asked to click 'Done' once you do this you'll be returned to the compose mode of your post (if not just click on it).
 In this mode you should be able to see your text and the image. Click on the image and drag it to where in your post you would like the image to appear.
Now you can add as many images as you like, and place them in your post so that they will have the most meaning. Happy Blogging!
Testing Spresent
So as this turns out Spresent is a free web service that allows you to create presentations in flash. It's all pretty much point and click.
Making the Classroom Easier to Manage
Whether or not you have a blog making the classroom easier to manage is a topic we're all interested in. The smoother things run, the more time in the day we have to work with our students on math, reading, writing, sports, the yearbook, or even just listening to them tell us about their weekend. That's why most of us became teachers I think.
Chasing down missing assignments, getting materials to students who were absent, leaving handouts at the office for students who are absent, answering questions about when something was due, or how it was to be done are tasks that almost always require more time than it would seem we have. Wouldn't it be nice to have one answer for all of these?
Student: "I need (fill in blank with your most common request of your time here).
You: "Did you check the blog?"
Student: "No"
You: "Everything you need is there." (smile)
Doesn't that sound nice? Once you become more and more capable at posting you will soon find more and more uses for your blog. It's like having an electronic secretary that has all of your information available world wide, twenty four hours of every day (if you want it to be...if not just delete it).
If you have handouts, post them to the blog. There are many ways to do this without retyping them in a new post. Try esnips for a start, but there are many other free file storage services. Or, save it to your web page on the division server, copy the link into your blog. If this sounds good but you're not sure how to do either of these, leave a comment and I'll get back to you.
When you give an assignment, summarize the expectations (page number and questions for example) in a new post. Give a due date.
Have some lesson notes you'd like to have posted. Invite a student to be an author, or have them type the notes using Word. Copy and paste the notes into a new post.
Going away for a session for a day and need to leave a lesson plan. Post your plans for the day to the blog for each class.
Perhaps you'd like students to express an oppinion on a news item for a History class, a solution to a math problem, or creatively write based on an image you have selected.
Post a link to the news item (or embed a video clip of the broadcast) and have the students leave their responses as a comment. This has great potential since each would be able to read the previous oppinions and a discussion might develop.
The math solution could be scanned and posted as an image, or typed (mathtype works well for this-leave a comment if you have difficulties) and have the students submit an answer on paper, or in the comment box. If you're creative, post an incorrect solution to a math problem and have them try to identify the error.
Post the image for the creative writing assignment and have the students leave their response in the comment box. Or have students create their own blogs and respond there. It could work like a portfolio. If you're worried about how you might manage 30 or more blogs look into RSS feeds and bloglines-it works like an electronic 'in-box'. I can help with this too.
The potential for blogging in the classroom is limitless since a blog works a lot like a notebook. Anything you might use a notebook for, you can use a blog for too.
Linking...Quick and Easy.
Most of us have a list of regular sites we use as resources. Now you can add them to your blog to make it easier for you and your students to find them.
Navigate to the the Template tab and select the Page Elements link.

This is a basic view of the layout of your blog. At the right find the 'Add a Page Element' link and click it.

This is a pop-up window which will allow you to add anything you see. Select the Link List option by clicking the 'Add to Blog' button.

In this screen you can add the title of your links. Perhaps it will be a list specific to a particular class. You can also title the web page, and add the web address.

Don't forget to 'Save Changes'. After you have a few links you will have the option to reorder them if you wish.

Navigate to the the Template tab and select the Page Elements link.
This is a basic view of the layout of your blog. At the right find the 'Add a Page Element' link and click it.
This is a pop-up window which will allow you to add anything you see. Select the Link List option by clicking the 'Add to Blog' button.
In this screen you can add the title of your links. Perhaps it will be a list specific to a particular class. You can also title the web page, and add the web address.
Don't forget to 'Save Changes'. After you have a few links you will have the option to reorder them if you wish.
Bling for your Blog...(Enhancing your blog with other web resources)
Once you've mastered the basics of blogging it may be time to 'add on'. There are many ways that you can do this and it all depends on your likes and your needs. You may wish to use a web based photo album application in the sidebar to enhance the look of the pictures you post, or perhaps just add a calendar. These are usually referred to as 'Widgets' and are all embedded in you blog in much the same way. If you can cut and paste in a word processor, you can add a widget.
Once you find a widget you want to use there will be a portion of code you will need to select and copy. Highlight the code you require and right click. Select copy.

Now, navigate back to the Template tab of your blog.
Select the Page Elements link (if it isn't already opened).
What this image represents is the basic layout of your blog. If you select the 'Add a Page Element' at the right you will be presented with a pop up screen.
Select the Html/Java script option and another pop-up window will open.

Paste the code you copied into the lower window and add a clever title if you wish. Select save changes. You will be returned to the Page Elements screen. If you wish you can change the location of your newly added widget by click and dragging it the new spot.
Sometimes widgets don't always format correctly and may 'push' other elements in your blog around. The easy fix is to move them to another spot in your layout, but if you're willing to learn some code, ask any of your students if they know some html. They are just about the best resource you have, and it's a great way to involve them in your new blog. This is how I learned to add the stuff you see here.
Once you find a widget you want to use there will be a portion of code you will need to select and copy. Highlight the code you require and right click. Select copy.
Now, navigate back to the Template tab of your blog.
Select the Page Elements link (if it isn't already opened).
What this image represents is the basic layout of your blog. If you select the 'Add a Page Element' at the right you will be presented with a pop up screen.
Select the Html/Java script option and another pop-up window will open.
Paste the code you copied into the lower window and add a clever title if you wish. Select save changes. You will be returned to the Page Elements screen. If you wish you can change the location of your newly added widget by click and dragging it the new spot.
Sometimes widgets don't always format correctly and may 'push' other elements in your blog around. The easy fix is to move them to another spot in your layout, but if you're willing to learn some code, ask any of your students if they know some html. They are just about the best resource you have, and it's a great way to involve them in your new blog. This is how I learned to add the stuff you see here.
Subscribe to:
Posts (Atom)
